





In the previous articles, we understood the basics of ReleaseOps and core concepts. After that, we learnt how to set up the ReleaseOps in your environment.
Now comes the most important part, where we test the entire pipeline end-to-end, and ensure that our update sets are moved from DEV → PROD automatically. When you see ReleaseOps in action, you will know its magic and why every ServiceNow client should implement it.
We will work through the complete flow starting from:
- Creating an update set.
- Raising a Deployment Request.
- Understanding Releases.
- Triggering deployments.
- Validating movement across environments.
- Understanding what is happening behind the scenes.
The objective here is not just to move an update set successfully, but to understand how all the pieces connect together.
Understanding the Overall Flow
Before moving through each step, let’s first look at the complete process at a high level, so that we understand exactly what we are trying to do.

The important thing to understand here is that ReleaseOps is mainly coordinating and governing the deployment process. The actual Update Set movement still relies on traditional Update Sources in the background.
1. Create an Update Set in the DEV Environment
For testing purposes, we will keep things very simple – let’s go ahead and create an Update Set in the DEV environment. You can select any scope, but let’s keep it “Global” for now.
After creating the update set, we will push a small customer update. This can be anything, such as Fix Script, Business Rule, or even a field creation.
In my example, I have created an Update Set called “ReleaseOps Demo” and pushed a Fix Script in this Update Set.

2. Complete the Update Set
Currently, your Update Set is in “In Progress” state. Verify that the customer update is properly captured in the Update Set. After that, you simply “Complete” your Update Set.

3. Create Deployment Request
This is where the actual ReleaseOps flow begins.
Once the update set is completed, you will notice the “Promote Update Set” button on the Update Set screen (if it doesn’t appear, you haven’t installed ReleaseOps in your current instance).

When you click “Promote Update Set”, a tab opens in your browser. The new form is a record producer form to create a Deployment Request in the Controller Instance (PROD Instance). That means, when you clicked on the button in the DEV environment, it redirected you to a form in PROD. You would have configured this when you had updated the System Properties from the previous article.

A Deployment Request is basically the record that tracks and manages the deployment process in a PROD instance. It becomes the central place from where the deployment journey is monitored.
Here you have an option to choose an existing “Deployment Request” or create a new one.
4. Understanding Deployment Request
Once the Deployment Request gets created, you will notice that several things start connecting automatically.
The Deployment Request contains information like:
- Which update set is being deployed.
- Who initiated the deployment.
- Target environment.
- Current deployment status.
- Associated Release.
- Pipeline being used.
This record becomes extremely important because it gives visibility into the complete deployment lifecycle.
In real enterprise implementations, this helps teams track the following without relying on manual coordination:
- Deployment history.
- Approvals.
- Failures.
- Deployment ownership.
5. Creating a New Deployment Request
For the demo, we will create a new Deployment Request from scratch. We will check the “Create new deployment request” checkbox, and we will see more fields to fill in.
Let’s now discuss the first half of the form. You will need to include a Short Description explaining what the Deployment Request is about.
Next are the Assignment Group and Assigned To fields, which signify which group and team member is responsible for taking care of things if anything breaks in the pipeline. Although these fields are not mandatory, I would recommend putting in an Assignment Group field at the very least.
Next is the Source environment – this will always be your DEV environment. This is basically telling ReleaseOps from where the pipeline will start, or where your original update set is residing.

Moving on to the second part of the form, when you scroll down on the Deployment Request form. Here you have an option to select an existing Release, create a new one, or entirely skip it and leave it for later. We will skip this for now.
Next, we can select specific Instance Scans and Automated Test Frameworks (ATF) to run. We will skip these as well. Lastly, we click on the “Submit” button on the bottom right.

When you click “Submit”, the record producer is submitted, and it shows the record form that you just created (as shown in the screenshot below).

6. Create a New Release
You can think of Release as a container carrying multiple Deployment Requests (DR) together. In other words, multiple developers can push their DR into the same Release.
From the same Deployment Request screen, we will create a new “Release” by clicking on the magnifier button on the Release field.

After clicking, a new pop-up appears, and we can go ahead and create a new Release by clicking on the “New” button on the top right of the pop-up.

Fill in the following details, because they are mandatory to make your Pipeline run smoothly.
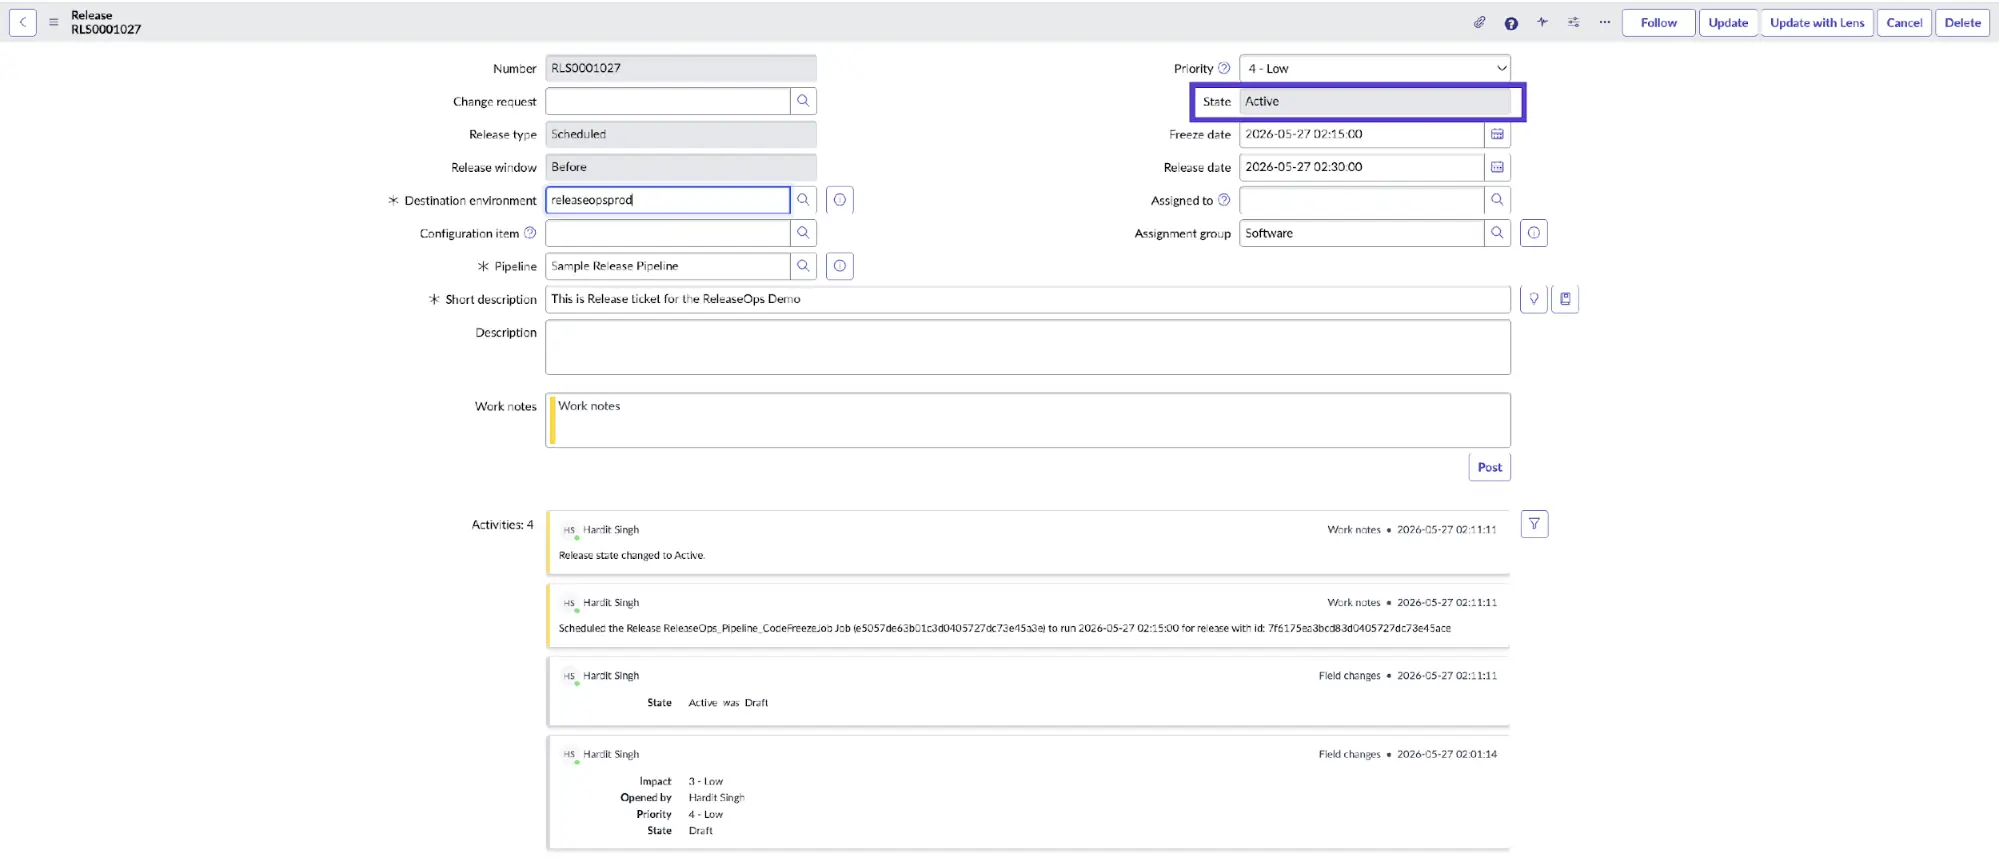
- Destination Environment: You will have to specify the Production instance here. Also, just note that the Release record which you just created is also on the PROD environment.
- Pipeline: This specifies which playbook to run. We will go ahead and select OOB pipeline “Sample Release Pipeline” or you can select your own pipeline if you have created one already.
- Freeze Date: It is important to select a Freeze Date, as this will inform the developers till what date and time they can add Deployment Requests to this Release. (Multiple DR can be linked to one release).
- Release Date: This is also an important field, as at this time, the deployment of the update sets to the PROD environment will start. If you are testing your ReleaseOps pipeline, I would recommend keeping the Freeze and Release Date at least 20 minutes from the current time. In real time, the release date could be after a few weeks.
- Assignment Group: This is the group that is responsible for taking care of the whole release. This could be your Platform team.

7. Activate the Release
Once you have submitted the Release record, ServiceNow will navigate you back to the Deployment Request (DR), and your Release field is populated. Save the DR and navigate back to the Release record using the same reference field on the DR form.
Once you are in the Release record, you will see a button “Activate Release”. This is an important step because if your Release is not active, nothing is going to get deployed.

Once you activate the Release, the status of the Release ticket changes to “Active”.
8. Mark the Deployment Request as “Ready to Access”
Once the Release is marked as Active, navigate back to the DR and refresh the form, and you will see a new button appearing on the form called “Ready to Access”. Click on the button, and it will change the status of the DR ticket to “Ready to Access.”


9. Validate the Update Sets in the TEST Environment
In the TEST environment, navigate to System Update Sets → Local Update Sets, and you should see your Update set as “Complete”. (If it is in Loaded state or doesn’t appear at all, give it some time.)

10. Validate Deployment in the PROD Environment
Once the Update Sets are deployed in the TEST environment, we will wait for them to get deployed in the PROD environment. This will happen only on the date and time you had selected in the Release Date when creating a Release ticket.
Below is a screenshot of the Update Set when it has been deployed to the PROD environment.

In the next screenshot, you will see the updated status of the DR. Notice that the State of the Release has changed to “Completed”.

Finally, when we check the status of the Release record, we will see that the release was successfully completed, and the update sets were successfully deployed.

A Few Things I Learned About Testing ReleaseOps
After testing ReleaseOps practically, a few things became very clear to me.
The first is that Update Sources are still extremely important. Even though ReleaseOps introduces a much more structured deployment experience, Update Sets are still moving through traditional ServiceNow mechanisms underneath.
Second, keeping the Controller Instance configuration correct is critical. A single incorrect configuration can completely confuse the deployment direction.
Finally, I would suggest not building NASA-style perfect pipelines from Day 1. Start simple.
A basic flow like this is more than enough initially: DEV → TEST → PROD.
Once the process becomes stable, then gradually introduce:
- Approvals
- Validations
- Governance
- Advanced playbooks
Final Thoughts
Once you test ReleaseOps end-to-end, you will begin understanding that the platform is not just about moving Update Sets.
It is really about introducing structure, visibility, governance, and consistency into deployments.
And, honestly, that becomes increasingly important as ServiceNow implementations continue growing in size and complexity. Technology grows fast. Processes usually don’t.
And I think ReleaseOps exists because deployments have finally reached that breaking point.